
Clinician’s Corner – Educational Content for Clinical Directors,
Chief Dental Officers, Clinical Boards and the Entire Clinical Team.
Sponsored by Ivoclar USA

In dentistry, less is more when it comes to conserving tooth structure as a guiding philosophy for developing your treatment plan. In this case study, Dr. Tony Mennito shares his protocols for using highly esthetic composite resin restorations in a cost-effective, time-saving approach.
 Written by Dr. Anthony Mennito, Expertise Dental. Dr. Anthony Mennito (Tony) is a dentist at Expertise Dental and adjunct faculty member at the Medical University of South Carolina in Charleston, SC. Aside from his love of dental technology, Dr. Mennito also has a passion for dental materials, in particular bonding agents and composite resin. He is part of a team with a patent for a novel antimicrobial bonding agent and has taught several hands-on technique courses related to the placement of both anterior and posterior direct composites. He has over 20 publications in peer review journals related to his research on the topics of digital technology and dental materials.
With minimally invasive dentistry guiding today’s treatment choices in restorative care and natural-looking, highly esthetic outcomes demanded from our patients, the use of composite resin materials is taking a front seat when restoring defects in both arches. The goal is to save as much tooth structure as possible while providing the patient with a restorative solution that blends seamlessly with their adjacent natural teeth.
The ability to place highly esthetic composite resin restorations chairside creates opportunities for practitioners and patients to make decisions that may be more cost-effective and time-efficient than all-ceramic indirect options. Whether repairing enamel defects, a fracture on a single central, closing a diastema, improving esthetics by altering tooth shape, color, length or alignment, or treating a Class II case, direct composite resin restorations are an efficient, minimally invasive option compared to more invasive indirect approaches such as crowns and veneers.
Several factors are key to achieving an esthetic and long-lasting direct resin composite restoration. Of primary importance is material choice. Understanding the formulation of the composite resin, its physical and mechanical characteristics as well as optical properties, helps guide which material will work best for each indication. Of equal importance is tooth preparation for maximizing long term success while preserving, conserving and reinforcing the tooth structure of the restored site.
In the two anterior cases presented below, these factors came into play while restoring a fractured single central incisor with underlying decay in Case 1 and a small lateral with a failed restoration due to a fracture in Case 2. Using a simplified two-layer technique both teeth were restored to a life-like natural appearance using a cosmetic procedural protocol developed to save chair time and ensure a predictable case outcome.
Case I
A patient, who was healing from the extraction of tooth #7 and awaiting implant placement, also required repair of a fractured central incisor tooth #8 with decay on the incisal edge (Figure 1). After explaining the restorative options available to restore the tooth, the patient decided the direct composite approach would serve best to save healthy tooth structure and be the most time- and cost-effective treatment.
When restoring using the direct composite method, several key procedural tips will help ensure success. One key to the esthetic success of any direct composite case is determining the correct tooth shade. Shade matching should be completed while the patient’s teeth are hydrated and prior to isolation as dehydration results in a tooth appearing whiter than when hydrated. In this case, the shade of the patient’s tooth was determined to be A4.

Figure 1. Patient awaiting healing for implant placement for tooth #7, required repair of fractured tooth #8
Keeping the restorative site dry during direct composite application is also critical (Figure. 2). Due to the hydrophobic nature of composites, proper isolation of the restorative site keeps it dry and free of contaminants to prevent bond failure and microleakage as well as other issues. Once the patient in this case was retracted and the site isolated against moisture and contamination, a two-step layering technique was undertaken to repair the tooth.

Figure 2. Isolation is key to restorative success when using a direct composite technique. Prior to isolation of the site, shade matching should be completed while the tooth is hydrated.
To set the value of the final restoration and visually block the fracture line, the first layer applied was Tetric Prime A3-5D, a dentin-shaded composite (Figure 3). In order to mimic the translucency of enamel, the second layer of composite was more translucent, Tetric Prime A4, and easily sculpted using the Optrasculpt Pad (Figure 4).

Figure 3. Using a two-layer technique, the first layer of composite sets the value of the restoration and will block the fracture line.

Figure 4. The second layer of composite should be more translucent to match the translucency of natural teeth.
After finishing and polishing to a natural life-like appearance (Figure 5), the patient was advised the value of the restored tooth would appear low until the tooth is fully hydrated, which may take a few days to return to normal. Explaining this to the patient helps to offset immediate disappointment in terms of esthetic expectations.

Figure 5. The final restoration immediately after dam removal. The value of the tooth will appear low until the tooth is fully hydrated.
Case 2
This case involved a small lateral tooth #10 that had been previously restored but now had a partial fracture due to the failure of the old restoration (Figure 6). The same shade-taking and isolation steps were taken as in Case 1 prior to applying composite to repair the tooth. In this case a lighter shade of dentin composite was chosen, Empress Direct B1D, for the two-layer technique because of the lighter shade of the tooth and the lack of a bright dentin shade in the Tetric family, and Empress Direct B1E for the second and final layer. After finishing and polishing the fracture line disappeared and the restoration blended seamlessly with adjacent dentition (Figure 7).

Figure 6. Pre-op photograph of a patient with a partial fracture of lateral tooth #10

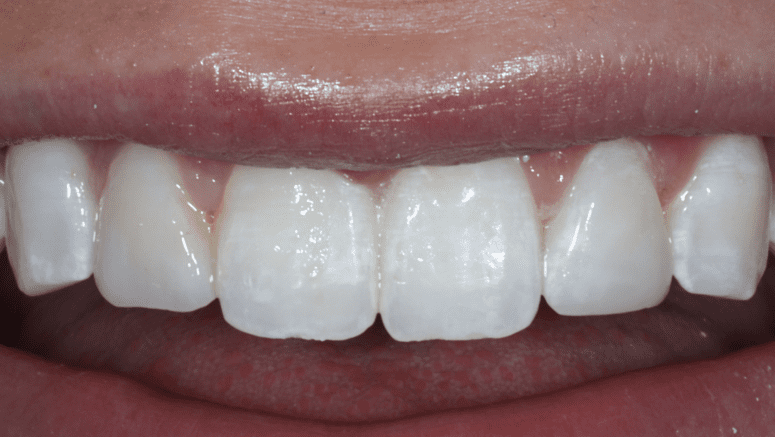
Figure 7. The final direct composite restoration blends seamlessly in the mouth with no visible sign of the fracture line.
Using the right materials and techniques, direct composite restorations can rival indirect ceramic options to provide patients with the highly esthetic cosmetic solution they demand while minimizing the loss of healthy tooth structure.
Ivoclar Academy offers leading education for clinicians, hygienists, and technicians across all levels of experience. Courses and resources are specially curated by an internal education team, industry innovators, and over 800 world renowned expert partners. In his course Dr. Mennito will dive into dentistry’s profound love for esthetic dentistry.
While ceramics are the standard for esthetic excellence, not every patient who wants to upgrade their smile is a good candidate for this material. Dr. Mennito will cover everything from photography, prep to polish and important tips as it relates to everyday cosmetic procedures that will keep your patients smiling.
To learn more on mastering advanced direct
composite skills and techniques, sign up now for a
hands-on workshop with Dr. Mennito being held
June 8, 2023, at the Ivoclar Academy Amherst, New York.